Garlic Chive Flower Vinegar


I have been wanting to try making this for a long time but just never have. 
Well, the garlic chives have been blooming in our garden like crazy so today was the day !!

It was so easy and it smells so good ! 
I'm not sure how long it will need to 'steep' but I'm going to taste it in a week and see how it's going ! 
I can't wait to try it ...

Here's how you make it.
Get some garlic chive flowers ... out of your garden, or a friends garden, is good.


Take pretty pictures of them.


Find a glass jar ...


Take some more pretty pictures.


Pop the flowers into the jar ...


Add apple cider vinegar vinegar.


Take out into the garden and take more pretty pictures.


Smile about how clever you are.

And that's it.
Easy !

Sticky Date Pudding


I LOVE STICKY DATE pudding.
I had never had it before coming to Australia ...

Here's how you make it ..

For the pudding:
250g pitted dates, chopped
1 tsp bicarb soda
1.5 cups boiling water
125g softened butter
1 cup brown sugar
1 tsp vanilla
2 eggs
1 and 3/4 cups self raising flour, sifted

For the sauce:
1 cup brown sugar
300ml thickened cream
1/2 tsp vanilla
60g butter

Preheat oven to 180C/350F

Line (or grease) the base of a cake pan. I used a round one.

Soak the dates in the boiling water, with bicarb soda mixed in. Soak for about 20 minutes. Don't tip out the water ... although, I did (accidentally) and it was fine after I replaced it. But still, it's better if you use the water the dates soaked in !

Put the butter, sugar and vanilla in your electric mixer. Beat til pale and creamy. Add eggs, one at a time. Beat well after each one is added. Fold the date mixture and flour in until well combined.

Pour this into the cake pan. Bake 35-40 minutes or until a skewer comes out clean from the centre of the cake. (this is tricky though since it's a sticky date ! ours didn't come out totally clean but it wasn't all goopy anymore ) Turn onto a plate.

Make the sauce ...

Over a medium heat, combine sauce ingredients in a sauce pan. Stir often, til sauce boils. Reduce heat and simmer for a couple of minutes.

Make holes all over the pudding with a skewer. Pour warm sauce over warm pudding. Let stand 10 minutes. Serve with remaining sauce and ice cream !

YUM YUM YUM !!

Pistachio Dukkah


oh boy do i love this stuff !
i had dukkah for the first time about 10 or 12 years ago at christmas dinner with friends
i loved it straight away !

then a few years ago, my friend kel and i found it at the markets 
yum yum

we have talked about how easy it must be to make
but just never made it
until last week !

i went to visit kel for her 40th birthday weekend celebration extravaganza !

we made dukkah

i'll never buy it again.


Here's how we made it ...

1/4 cup sesame seeds
3 tablespoons coriander seeds
1 tablespoon cumin seeds
2 cups pistachios (buy the ones already taken out of the seeds !)
salt
pepper
olive oil
turkish (or your choice of) bread

So ... dry roast (in a frying pan) the sesame seeds til golden. Tip into the food processor. Dry roast coriander and cumin seeds til fragrant. Tip into food processor. If the pistachios aren't already roasted and salted, dry roast them and add a bit of salt. Tip into food processor. Add pepper. Process til chunky ... see photo !

Serve with olive oil and bite size bread chunks.

To eat ... dip bread chunk into olive oil, then into dukkah ! Enjoy !! YUMMMMM !!

I'm making this again tomorrow for Christmas Eve with the family !!

Autumn Spinach Salad


10 oz (or so) fresh spinach
ripe pear
1/2 c red onion, sliced thin
1/2 c dried cranberries (can substitute pomegranate)
1/3 c walnut pieces (optional)
1/3 c cider vinegar
1/2 c canola oil
1 tsp Dijon mustard
1 tsp sugar
salt (optional)

Wash, dry, and tear spinach leaves into bite-sized pieces and put in salad bowl. Core pear, slice thin or cut in bite-sized pieces. Dip pear pieces in the cider vinegar, then add them to salad. Add red onion and cranberries (or pomegranate).

To the remaining cider vinegar add the oil, mustard, sugar, and salt, and whisk together.

Just before serving, Dress salad with the Dijon vinagrette, toss gently, and sprinkle on walnuts if desired.

Chipotle Chicken Posole


Sundays are a hectic day at our house. We are up early, gone late and the last thing either  of us want to do is make lunch, spend more money, or eat poorly. So we have been trying to kill all three birds with one crock pot.

Last night I was rummaging around for whatever was on hand, trying do decide what to throw in the ol' crockery and i found this:

2 bone in chicken breast
1  15 oz can of gold hominy (you can substitute corn)
1 can of diced green chiles
2 chipotle peppers in adobo sauce
1 seeded and diced jalapeño pepper
1 medium onion chopped
6 chopped garlic cloves
some chopped celery
cilantro


I had no homemade stock on hand so I boiled up some 6 cups of water and threw in 2 chicken cubes and a half of a bacon bullion cube.  I let it cool and then set it aside to use in the morning.

This morning I seasoned the chicken with pepper, salt, smoked paprika and some Trader Joe's 21 seasoning salute.  I love this stuff.  I poured the stock in the crock pot and set the chicken in it.
Pour in the whole can of hominy with the juice and add the onion, celery, garlic, jalapeño, chipotles, and chiles then stir.

I covered and cooked for 5 hours on high.

When we got home I removed the chicken and deboned and shredded and added back to the soup.
This is when I added cilantro. I love the stuff, but no one else in my house does so it also works to add it to each individual bowl.

A good way to cut some spice is to add some sour cream if you have it.

Turns out the soup is about 300 calories per bowl.
Tasty, delicious and pretty inexpensive.

Chicken & Black Bean Tostada Bowl


When we were in the States I bought some Tortilla Bakers for making individual tostada bowls. I used them for the first time (with tortiallas) the other night.

I followed the instructions on the box for making the bowls.

Lightly spray your little bakers with non stick spray.

Between damp paper towls, microwave your tortillas for about 15/20 seconds. Fit it into the baker. Bake in 350F/170C oven for 5-8 minutes. (I will do ours longer next time. I was worried they would burn but the bottom and sides weren't really crispy like the top ~ as you can see in the photos !)

Cool for 5 minutes before removing from baker. Then place on rack to cool completely.

We filled these ones with ....

Chicken, diced and cooked with a mexican spice mix
Black beans, straight out of the can, drained
Tomatoes, diced
Spring Onion, chopped
Cheddar Cheese, grated
Greek Yoghurt, dolloped (you could use sour cream but we didn't have any)
Avocado, chopped
Lettuce, chopped small

Veggie Fish Bake


Veggie Fish Bake

Preheat oven to 425 degrees

4-6 medium to large potatoes, peeled and sliced approximately ¼ inch thick
4 medium to large carrots, peeled and sliced approximately ¼ inch thick
1 medium onion, peeled and sliced approximately ¼ inch thick – separated into rings

Spray large baking dish with Pam (I used olive oil Pam).
Layer potato slices in the bottom of the dish. Next, evenly spread the carrots and then the onion rings over the layers of potatoes.
Melt 2T of butter and stir in 1t of dried basil and 1t of dried dill weed. Sprinkle butter mixture over veggies. Evenly spray another layer of Pam over the veggies. Cover and bake until potatoes feel like they are approximately 15 minutes from done. (I baked them for approximately 40 minutes)
Meanwhile, melt 2T of butter and stir in 1t of dried basil, 1t of dried dill weed, salt and pepper (I used white pepper cause I like it best), and 3t of lemon juice (I didn’t feel like squeezing fresh, so used the bottle and it turned out fine).
When the potatoes feel like they are getting close to done, place four fish fillets (your favorite white fish…can’t remember what I used!) over the veggies. Spread the second batch of butter mixture over the fish. Recover and return the pan to the oven. Bake for 15 to 20 minutes or until the fish is flaky and done.
Meanwhile, chop two medium tomatoes (I chopped mine rather small). When the fish is finished, sprinkle the tomatoes over the fish. Recover and return pan to the oven for 5 minutes.
Serve.
DELISH!!! EVERYONE in the family went back for seconds!! My mom used to make this when I was a kid (only fish recipe I recall liking as a child!), and I stumbled upon it the other day when looking for meals I could eat while on my post-gall bladder surgery restricted diet. It was such a hit that it's going on the make again soon list! :-)

Creamy Ham and Greens

 
So, last night was a bit of a scrounge around and see what I could find to make for dinner.  I need to go shopping but I'm really not motivated to do it because we have two late sporting nights ... tonight and tomorrow ... and then it's Friday ... and then we have another Christmas party ... and I'm waiting on the $250 food voucher that should be coming today ( it was part of the deal we got when we bought our new fridge last week )  And ... And ... And ... 

What I came up with was ... spanish tortilla ... potatoes baked like for spicy potatoes but without the spicy.

I had some ham in the freezer that needed using, I had silverbeet, rainbow chard and kale in the garden that needed picking, I had a bit of cream leftover from Rory's birthday carbonara and I always have garlic and onion on hand .... 

This is what came of those ingredients.

1.5 cups slivered ham, chopped ( I had a triple smoked one )
3 cups mixed greens, chopped
2 cloves garlic, diced
1/2 a red onion, diced
cream,  (I only had 1/4 of a cup and I think it was plenty !)

Start with a bit of olive oil in the bottom of your pan, add garlic and ham.  I started with the heat pretty hot and then turned it to medium pretty quick.  Once the garlic and ham have started to brown, add onion.  Cook a minute or two more than add the greens.  Cook a minute or two and then add the cream.  Cook a minute or two more ... or until the cream is no longer runny and seems to be coating the other ingredients.  Serve hot.  So yum !!

This served the four of us.

Grandma's Cranberry Fluff

This right here is all my childhood Thanksgivings rolled up in one sweet dish ! It's what I looked forward to every year ! My Grandma's Cranberry Fluff !!

This year I got a text from my Aunt Lissa saying "we have a huge problem ... cranberry fluff is not on the beans blog !" Well, that just can't be ! The world needs cranberry fluff ! Aunt Lissa sent me a photo, and I pinched another one off my Dad's facebook page and I'm about to share the recipe with you !


In the photo above, you see one bowl pre whipped cream and one bowl post whipped cream ! :)

What you need (and do):

2 cups raw groundup cranberries (frozen works best and I've never bought them ground, you have to do that yourself ! I've found a food processor works well for that job.)
3 cups small marshmellows
3/4 cup sugar

Stir those first three ingredients together and chill overnight.

2 cups peeled, diced tart apples (green)
1 cup green grapes (quartered)
1/2 cup chopped walnuts
1/4 tsp salt
1 cup whipped cream or cool whip

Add next four ingredients to the chilled cranberry mixture. Right before serving, fold in the whipped cream.

Serves 8-10.


My beautiful Grandma with this years cranberry fluff.

Tempura


Rory made tempura cod last night. It was delicious ! Following the instructions on the back of the bag, he did it like this ...

4 pieces of cod
125g tempura batter mix
180ml cold water

Whisk the water and batter mix together. Do not over mix (it's ok to have a few lumps). Coat the fish and shallow fry in hot oil until golden brown and fish is cooked through. (ours took about 15 minutes, cooking all four pieces together in the same cast iron fry pan)

We had leftover batter too so Rory chopped up a zucchini and did them as well. They were super yum !

We squeezed fresh lemon juice onto the fish and served with tartar sauce.


Also pictured: Sesame Asparagus and Basil Zucchini Mini Muffins

Basil Zucchini Mini Muffins


I saw these over on Join in the Feast.  Have you been to that website ?  No ?  You should go check it out !  The author is a friend of mine ... a friend I haven't met yet.  I knew her husband way back when we were in highschool and "met" her  on line ... on facebook, I think.  I can't remember, it's been a few years now.

Anyway ... go check it out.  Join in the Feast is on facebook too ... you should LIKE it !

These muffins are so cute and tiny and so very very delicious.  They were a huge hit with the kids ! Here's the recipe ... I'm sharing with Laura's permission.

3/4 c flour
1/2 c wheat flour
1/2 tsp baking soda
1 tsp baking powder
1/2 tsp fresh-ground pepper
2 Tbsp softened butter
1 Tbsp sugar
1 egg
1/4 c buttermilk
1 & 1/2 c shredded zucchini
1/2 c finely sliced basil leaves

In a small bowl, whisk together the flours, salt, baking soda, baking powder, and pepper.

In a bowl cream together the butter or shortening and the sugar, then beat in the egg and the buttermilk until the mixture is well blended.


Stir in the zucchini and the basil. Add the flour mixture to the zucchini mixture, stir the batter until it is just combined.

Divide batter among 24 well-buttered gem tins (each 1/8 cup).


Bake the muffins in the middle of a preheated 400°F (200°C)oven for 15 to 18 minutes, or until a tester comes out clean, turn the muffins out onto a rack, and let them cool.

My Menu - Bonnie - 21 November 2011


Quickly today ... here's our menu for the week.

Monday

Tuesday

Wednesday
Burrito Bowl's on the run ! (we will be out all evening !)

Thursday 

Friday
out

Saturday 
company Christmas party

Sunday 
play it by ear

Best Cheesecake EVER

Cheesecake...sooo yummy, but how to make it come out just right?? This recipe takes time (although almost all of the time is cooking and cooling), but the creamy, yumminess is OH SO worth it!

Step 1: Pound 1 3/4cup graham crackers into crumbs. I use a quart sized zip lock and a cup with a flat bottom.


Step 2: mix crumbs with 1/3 cup butter, melted, and 1/4 cup sugar (I used raw sugar so that's why it looks brown)


Step 3: press crumb mixture into the bottom of a spring form pan...I use the flat bottom glass


Let a little of the crumb mixture go up the side. Don't be a perfectionist with this :-)


Step 4: if you, like I never remember to get the cream cheese out of the fridge in time...soften in the microwave


Step 5: beat 3 - 8oz packages of softened cream cheese and 1 cup of sugar until well blended


Step 6: add 1 cup of sour cream


and 2 tsp (although I usually let a bit more splash in because I love it) of Vanilla and mix well. (this is your last chance to really blend things so don't be sigh about mixing)


Step 7: Add 3 eggs, one at a time, beating on low speed after eacch addition until JUST blended. DO NOT OVER BEAT!


Step 8: Pour into crust. Gently smooth mixture so that the crust is sealed in.


Step 9: Bake in preheated 325 degree oven for dark nonstick springform pan or 350 for silver...for1 hour or until center is almost set...this is key. It will keep cooking so make sure that the middle still jiggles a bit. (it took me a few goes before I really got the hang of how much jiggle was just right)


Step 10: After the baking, turn off the oven and open the door just a tad. Leave the cheesecake in the oven for an additional hour with the oven off.


Step 11: After the addition hour, remove the cheesecake from the oven and let stand for one to two hours (I often make this at night and am in a hurry to get to bed so only let it sit one hour). Chill at least four hours.


Ok - what are you waiting for?? You are going to LOVE this cheesecake...Go...Bake...Enjoy!!


try it on your smart phone ....


Have you tried using the TABLE OF CONTENTS ? If you look just under the header, you will see the following links:


The Table of Contents doesn't seem to work on all computers. I don't know why ... BUT, it seems to work on all smart phones. It's really handy for me as I use my iPhone instead of a printed recipe whenever I can.  So ... why don't you try it ?  See how the Table of Contents works for you and let us know ! 

Also ... if you are searching for a recipe you think you've seen here before but it isn't showing up in the Table of Contents, let me know and I'll fix it ! 

Hope ya'll are having a great day !  It's Wednesday morning, the start of my day off !  Woo Hoo !  Soon I'll take the kids to school and then I'll have 6 hours all to myself !  Yee haw !  

I'm really not a hill billy but I sure sounded like it just then ...

Bye.

Try out the T. O. C. ! 

Bye, maybe ?

One last thing ... have you seen The Beans Blog is on Facebook ?  Have you "liked" it yet ?

ok ... for real this time ... BYE !

My Menu - Bonnie - 14 November 2011


Sunday
B - French Toast
L - Leftover Burgers
D - Homemade Sushi


Monday
B - the usual (greek yoghurt, blueberries and homemade granola)
L - leftover sushi
D - tapas, mostly from "Jamie does Spain ..." mini meatballs, peppers, chorizo & garlic, baby clams, calamari, salad, pan (bread)

Tuesday
B - the usual
L - salad (and any leftover tapas)


Wednesday
B - the usual
L - salad

Thursday
B - the usual
L - Black Bean Chili Soup from freezer (if no leftovers)

Friday & Saturday
unplanned ! spontaneous ! we'll see what happens !

Cheesy Prosciutto Chicken and Asparagus


Modified from a recipe in Jamie's Ministry of Food cookbook. (one of my all time favorites !) I don't have any real measurements for this recipe but you don't need them.

4 chicken breasts
pecorino romano cheese block
fresh thyme
fresh ground black pepper
1 lemon
8 slices of prosciutto
olive oil

Score the bottom side of the chicken breasts. Sprinkle with thyme leaves, pepper and lemon zest. Grate cheese on top of that. Put two pieces of prosciutto on top of that. (so, two pieces per breast) Cover with glad wrap (saran wrap) and them bang them with the frying pan to flatten them.  

Heat a bit of oil in a frying pan.  Put chicken in, prosciutto side down.  Cook til chicken is cooked through.  Serve with lemon (that you zested) on the side.

I served this with asparagus and slivered garlic sauteed in olive oil and topped with toasted almonds ! Soooo good.

We had leftovers and I put them in a salad the next day. Amazing.

**

Ps ... sorry about the photo ! I'm making a lightbox this week so that I can take photos in the poor evening light !!

// My Menu // Khrista - October 31st- November 6th, 2011


Halloween Costume creation consumed most of my time last week, so I am late to planning a menu for this week.
As a result we ate out last night... Chick-fil-A... on Halloween night...there was NOBODY there!
It was really nice! We all ate and then the kids had the playscape all to themselves.
My Love and I actually got to sit in peace and "talk!" We might do that again very soon! :)
It was kind of like a date! ha! ha!

Here's a few links to recipes for this week:
Broiled Salmon with Herb Mustard Glaze
Sweet Potato Enchiladas 
Taco Pizza
Toasted Pita Salad

My Menu - Bonnie - 31 October 2011


Rory and I planned a quick menu together on the way to Movie World on the weekend ! Here it is ...

Monday

Tuesday
(this will be our first try of this!)

Wednesday

Thursday

Friday
Cauliflower Shep Pie ?

***

PS ... are all of the links showing up the same color ? What color ? I have them all set to the same color, but when I preview it, half of them are purple and half of them are green. I'm pulling my hair out trying to figure out what the heck I'm doing wrong !!!

Ice Blocks for Healthy Kids


Remember we had Jono guest blogging earlier in the week ?  Well, today we have Alia ... my 7 year old daughter .... we have been making our own ice blocks for years now.  The kids love them and I don't have any problem with them eating them because they are totally fruit !!

Here you go, in Alia's own words (and spelling) ...

***

Hello my name is Alia and I am going to tell you how to make ice blocks. First you get some fruit and put it in a blender or food prowseser. I yoused 3 mangos, 3 bananas, 2 kiwi, frozen berries, a hole tub off strawberries and 4 cups off water. Then you get your fruit and put one off the fruits in the blender or food prowseser and wall it is on por some water in it to make it smouth. Next por it in the ice block contaners. After that put them in the freezer and once thier frozzen tack them out and run it under hot water to open them. Finily eat them I hope you injoy.

***
Mommy's Translation:

prowseser - processor
yoused - used (i love how she spelled that one !)
hole - whole
off - of
wall - while
por - pour
smouth - smooth
ice block contaners - ice block molds
thier frozzen - they are frozen
tack - take
finily - finally
injoy - enjoy

AND ... she's listed out the total ingredients which was pretty clever as I had written down for her what she did in each one and she's added them all together !

For the mango one, I chopped up three mangoes. She added a banana (that had been frozen for banana bread) and maybe 1 cup of water.

For the strawberry one, she cut the green leaves off one punnet of strawberries, added a banana (again, frozen but thawed) and water.

For the kiwi one, I skinned 2 kiwi fruits for her. She added a (you got it ... previously frozen) banana and the water.

For the berry one. We had an open bag of mixed berries in the freezer that no one was eating. We let them thaw then she threw them in with some water.

Super easy. Fun for the kids to make. (apart from the chopping/peeling of a few of the more fiddly pieces of fruit, she did ALL the work !) Super yummy. The kids love these. And best of all. Healthy.

Jono's Roasted Pepper and Chicken Pasta Salad

We have a guest blogger today ! My boy Jono, who is nine, almost ten (!) cooked dinner for us last night. He got the recipe out of a cookbook he was given for is his birthday, but he made a few small changes.  I asked him this morning if he wanted to write a blog post about it and he was pretty excited to do it ! So ... here you go, in his words ...


hi i am jono and i am going to tell you how to make a roasted pepper and chicken pasta salad

you will need:
2 chicken breasts
1 yellow bell pepper
1 bag of any pasta
1 red bell pepper
a handful of rocket
for the marinade:
2 tbls olive oil
lemon juice from 1/2 a lemon
1 clove garlic, crushed
salt and pepper
for the dressing:
4 tbls olive oil
3 tbls rice wine vinegar
2 tsp dijon mustard
1 tbls green pesto
a bunch of chives
a handful of chopped parsley


first boil some water then get your two chicken breasts and wrap them in cling film. then bash the chicken with a mallet until flat put the chicken in a container and mix in the olive oil lemon juice garlic salt and pepper put in the fridge for 20 minutes. cut the peppers in half and take out the inside then put them under the grill until skin is black. then soak then in water until ready to pick up then pull off the skin and slice them. cook pasta according to packet heat a frying pan to a medium high heat put chicken in and pour marinade on top. once cooked cool for a couple minutes while cooling chicken put pasta in a bowl with peppers and rocket slice chicken and put into the bowl pour the marinade on and mix and it is done. 

Notes from Mom : I didn't want to change any of how he wrote his instructions so here are a few tips (translations) from me ...

bell peppers = capsicum

rocket = arugula

cling film = glad wrap.  saran wrap.

grill = broiler

We made the pesto for the dressing.  We used sweet and greek basil, just a handful or so.  Then added maybe a tablespoon of pine nuts, maybe the same of freshly grated parmesan, added a blub or two of olive oil.  A bit of salt and pepper.  We used the stick blender on that.  Then we just added the rest of the dressing ingredients to that and blended it some more, again ... with the stick blender.

This was DELICIOUS !!!  It served four of us for dinner, and there were three small portions left over for lunches .... luckily I didn't need a packed lunch today since it's my day off !!  Wooo Hooo !!!

// My Menu // Khrista - October 24-30, 2011

Can I fast forward to Sunday?! I am SO excited about our traditional annual pumpkin carving and pumpkin soup! I can't wait!!! 

The Bendeguz

So ... the other day my husband was craving Eggs Benedict. But it was already way past breakfast time and we didn't have any of the ingredients anyway so we just left it.  Then our friends invited us to come have pizza for dinner.  We never turn down pizza with Craig & Jodie ... this was no exception !  Rory threw out the idea of making an Eggs Benedict Pizza.  Craig was up to the challenge and the rest my friends, is history !  Mouth watering, record breaking, best pizza eva history !

So, how do you make it ?

You'll need your favorite pizza dough recipe. This one had a nice thick crust.

Roll out your dough.  Top with "funky lime" garlic and the oil you cooked it in.  (funky lime garlic ... heat olive oil in a small frying pan. Add freshly minced garlic and cook, stirring occasionally, til light brown ... DON'T BURN IT !! Burned garlic is bitter and yucky !)

Top with mozzarella cheese and sliced bacon.  Cook the pizza til cheese/crust are golden.

While pizza is cooking, make hollandaise sauce and poach a couple eggs. (recipe here)

Once pizza is cooked, drizzle hollandaise sauce on top, top with baby spinach leaves and poached eggs.

Try not to make groaning noises when you eat this ... (but don't be surprised to find that is an effort in futility !) 

Baked Brie


We had this at a friends house last year on Christmas Eve and I've wanted to make it ever since !  I don't think they did the jam though ... that was the addition of the friends we made this with last night !

This was so easy ! Not to mention DELICOUS !

All you need is:
1 sheet of puff pastry, thawed
1 wheel of brie
strawberry jam
crackers

All you do is:
Put the brie on top of the pastry. Top with strawberry (or your choice of)jam. Fold the pastry up to wrap the jam covered brie. Bake in 400F/200C oven til pastry is golden. We did it for 25 minutes last night ... I might try a little longer next time. 

Serve with crackers or fresh slices of crusty bread.
SO stinkin' yum !

Cranberry Buttermilk Scones with Sweet Orange Glaze


I LOVE scones....I make them all the time. Today I decided to tweak one of my favorite scone recipes and what happened was the most delicious scones I've ever made! And it's easy too!

Makes 16 medium size scones.

Ingredients:

- 3 Cups Flour
- a heaping 1/3 Cup Sugar
- 1 teaspoon Salt
- 2 and 1/2 teaspoons Baking Powder
- 1/2 teaspoon Baking Soda
- 3/4 Cup Cold Butter
- 1 Cup Buttermilk
- About 3/4 Cup Dried Cranberries (I like a lot so I just dump them in without measuring.)
-A couple Tablespoons heavy cream for brushing.

Directions:
Preheat over 400 degrees F.
(I use a kitchen aid but if you don't have one your fingers or a pastry blender will work just fine.)
In your bowl, combine flour, sugar, salt, baking powder, baking soda.
Chop your butter into cubes and throw into the bowl. Turn kitchen aid to stir and mix until the butter is about the size of peas.
Add the buttermilk and mix until combined then add the cranberries.
Dump onto a lightly floured surface and divide into two balls.
Pat each ball into 3/4 inch thick rounds. Next, cut each round into 8 wedges and place on a greased baking sheet.
Brush the tops with cream and bake for about 14 minutes or until lightly browned. It is easy to over cook these without realizing it so keep on eye on them. There is nothing worse than a delicious scone with a burnt bottom.

While they are baking, whip up the glaze.
About 1 cup of powdered sugar
About 1 teaspoon of grated orange zest
About 2 Tablespoons freshly squeezed orange juice.
As you can see, I'm not certain on the measurements for the glaze. I just mix it with a fork until it looks and tastes right.....hmm...Sorry about that.
You want it to be thick enough to spread across the top of the scones once they come out of the oven.
Let the scones cool about 15 minutes before adding the glaze.
Brew a pot of coffee while you wait for the scones to cool. Perfect for a blustery, autumn day!

My Menu - Bonnie - 18 October 2011


I didn't get my groceries done on line last week. It was a crazy busy week and before I knew it, I hadn't been home long enough to sit down and shop before the cutoff time to have my groceries delivered on my day off ! And after that, the week just kind of had me running behind it, hanging on for dear life. Don't get me wrong, it was a fun week and I loved it, I just didn't get the on line shopping done ! So yesterday morning I planned my menu and hit the shops in the afternoon.

I always want something easy or delicious (or both) the night I do shopping otherwise I might not want to make it ... I find grocery shopping can make me really exhausted ! Anyone else like that ?

So, last night was sushi ... YUM !

Monday
Sesame Seed Chicken Bites

Tuesday
Jamies 30 minute meals ...Tasty crusted cod, mashy peas, tartare sauce, warm garden salad. We've made this before. Sooooooo good !!

Wednesday
Another from Jamies 30 minute meals but this one is one we haven't tried before.
Killer Jerk Chicken, rice and beans, refreshing chopped salad, chargrilled corn.

Thursday

Friday and Saturday ... who knows ?! 
Last Friday we did panko crusted fish, antonio's potatoes and salad. 
and then Saturday we went out with friends for Thai ! YUM !

Eggplant Burgers


Look, I know the photo leaves a little something to be desired but I'm going to make myself a light box ... hopefully on the weekend ... and then I'll be able to take good food photos at night !

But ... don't let the photo deter you from trying this ! I loved this. My kids loved this. My husband loved all but the eggplant.

And it was easy. Easy peasy.

Eggplant, sliced into 1/2 inch slices. Salted and set aside.
Tomato, sliced
Mushrooms, sauteed with a bit of garlic powder

I started with the caramelized onion.  When that was about done, my husband grilled the eggplant and burger patties.  I sauteed the mushrooms.

To assemble ... eggplant, burger, tomato, mushrooms, onions ... the kids added cheese to theirs.  I had ketchup.  Rory had sweet chili sauce.  Jono has those two and BBQ sauce !

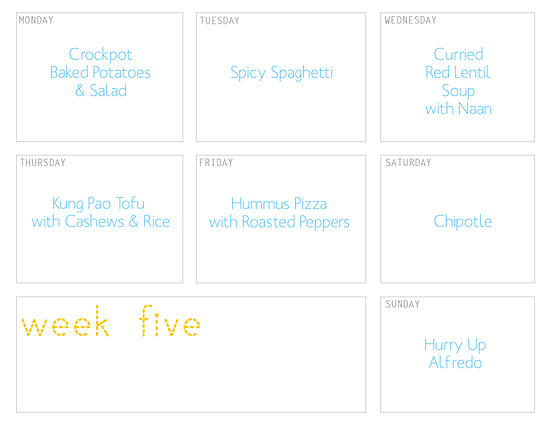
menu plan monday // Khrista 10.10.11

I've been doing a rotating menu/grocery list system for about a month now with great results.
I created four separate weekly menus and compiled a master grocery list for each week.
Usually on the weekend I will print out the next week's grocery list, mark off items I have on-hand, add items from my running list in the kitchen, and then go shopping.
It's been great not having to sit down once a week and produce a new menu, and compile a grocery list.
The above menu was added to the rotation this weekend. Some of our favorites.
(I will post the "Spicy" Spaghetti recipe this week! ;)

Spicy Chicken Soup

This was delicious. I used this recipe as a base but I made a few changes. If you are a kitten tongue like my cousin Pam, then you probably won't like this because it is SPICY !! But ... I pulled out some chicken before I added the chipotles, and cooked it in plain broth for Alia ... she liked that.


olive oil
1 onion, finely diced
7 cloves garlic, roughly chopped
2 chicken breasts, chopped into small bite size pieces
2 canned chipotle chiles in adobo sauce, finely chopped, plus 2 tablespoons adobo sauce
6 cups chicken broth
1 bunch cilantro
Juice of 2 limes
S & P
avocado, sliced for topping

Saute onion and garlic in olive oil, add chicken. Cook til just about cooked through. Add chipotles, adobo sauce, and chicken broth. Simmer for 15 minutes. Stir in cilantro and lime juice; season with salt and pepper. Top with avocado.

The original recipe said to top with the tortilla chips ... we didn't but Rory added a few crackers and Jono added sour cream to cool his down a bit.

This fed the four of us for dinner, with corn on the cob on the side, and there was one bowl leftover for Rory's lunch. Next time I might use three chicken breasts to stretch it a bit further ...